Home | My Brewing | Ingredients & Kits | Build a Mash Tun | Brewing Info | Links
Converting a 48-Quart Cooler into a Mash Tun
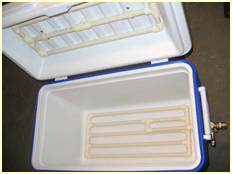
The following details the conversion of
48-quart plastic picnic cooler into an all-grain mash tun, which will be capable
of producing 5- to 10-gallon batches. This document is broken into three
sections:
1)
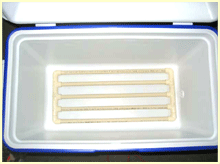
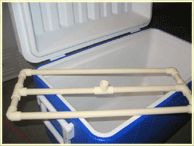
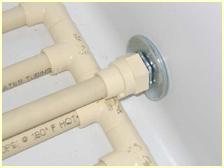
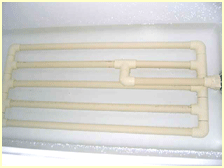
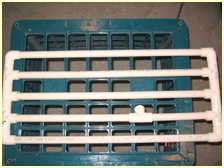
Construction of a CPVC manifold that lies beneath the
grain bed.
2)
Construction of a CPVC sparge sprinkler that is
attached to the cooler lid.
3)
Construction of a outlet valve and baffle assembly.
The goal of this document is to show you how these
parts can be constructed easily and inexpensively. Materials cost only $39. This
conversion uses a cooler that has a pre-drilled drain hole, which forced me to
be somewhat creative when it came to connecting the manifold with the valve
assembly. So, while these instructions are specific to my situation, materials
will differ only slightly based on whichever cooler you choose.
Manifold Construction
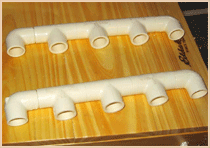
- Cut five (5) lengths of 1/2” CPVC to fit the length of the cooler interior. Allow for an inch or so of clearance on both ends of the completed manifold, taking into account the added length of the fittings. Clean off burrs with a utility knife or sandpaper (do this for all cut pieces of CPVC—it will help prevent potential clogs or plastic in your beer).
- Cut eight (8) 7/8” lengths of 1/2” CPVC.
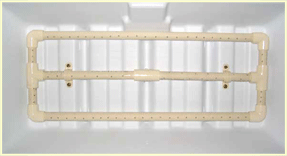
- Using four (4) of the shorter CPVC pieces, two (2) elbows, and three (3) tees, assemble one end of the manifold, with elbows on the ends and tees in the middle. Do the same for the other end of the manifold. (NOTE: It isn’t necessary to cement the CPVC pipe and fittings together. The pieces will hold together well enough on their own, and this also makes cleaning much easier. If you do decide permanently assemble anything, only cement the end of the manifold and use cement specifically for CPVC.)
- Use the longer CPVC pieces to connect the two
ends of the manifold. (NOTE: In the final section, I’ll describe how to
connect this manifold to the outlet valve with a baffle. Since that step
relies on the position of an existing drain hole, the connection position
will vary.)
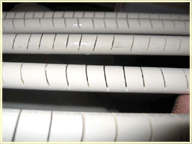
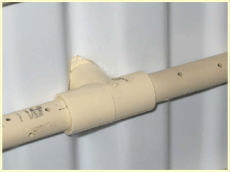
- With a hacksaw or Dremel equipped with a thin cut-off disc (makes the process much faster), cut slits about every 1/2” along each of the longer CPVC lengths. No need to be scientific; just keep the slits as narrow as possible, and don’t cut more than halfway through the pipe. The CPVC will lose much of its rigidity, so be careful not to break the pipe. (NOTE: Instead of slits, you could drill holes in the manifold using a bit with a diameter of 3/32” or less. I opted for slits, as I think they’re less likely to get clogged with grain.)
- The underside of the cooler lid will likely be beveled around the perimeter, leaving a flat region. Cut three (3) lengths of 1/2” CPVC to fit the length of the flat region. Once again, allow for added length of the fittings.
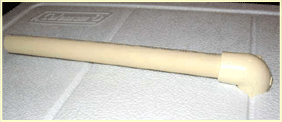
- Cut four (4) lengths of 1/2” CPVC to fit the depth of the lid, again taking into account the added length of the fittings (in this case, you have two elbows and a tee).
- Using two (2) of the shorter CPVC pieces, two (2) elbows, and one (1) tee, assemble one end of the sparge sprinkler, with elbows on the ends and the tee in the middle. Do the same for the other end of the sparge sprinkler.
- Cut about 3/4” out of the center of one of the lengths cut in Step 1. Measure to the middle of the pipe, then subtract and add 3/8” from the center point. Cut this chunk out, and connect the remaining pieces with a tee.
- Using the remaining longer pieces, and the assembly from Step 4, connect the ends of the sparge sprinkler.
- Drill 3/32” or 1/8” holes in the pipe every 1/2” or so. Again, nothing scientific, though I did alternate angles on the center pipe, and angle the holes toward the middle on the outer pipes to better distribute sparge water.
- Hold the sprinkler assembly up to the underside of the lid, and mark where the center tee touches the lid. Use a 3/4” spade bit to bore through the lid. (NOTE: You might want to transfer the measurement to the top of the lid and drill through that way. It’s easier to get the bit started on the flat surface of the top.)
- Once again, hold the sprinkler assembly to the underside of the lid. Place two (2) of the CPVC hanger brackets on the center pipe, and mark position to pre-drill for the brackets. Drill the holes. Affix the sprinkler to the lid with the hanger brackets and some small screws.
- GET CREATIVE. In my case, I use a small length of CPVC to connect the tee in the center of the sparge sprinkler to an elbow resting flush with the lid. This will be fitted with a quick disconnect of some sort to receive water from the hot liquor tank.
Outlet Valve and Baffle Construction
- Remove the existing drain plug from the cooler. The plug in my cooler was actually two parts that threaded together between the inside and outside of the end wall. If you don’t have a drain plug, use a spade bit to bore a hole through the end wall. The center point should be located evenly in the horizontal direction, and about 1-1/2” from the floor of the cooler.
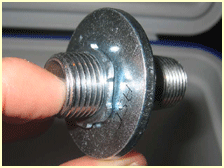
- Thread a conduit locknut unto one end of the 2” nipple as far as it will go. Place one of the washers unto the unthreaded section of the nipple. Put this three-piece assembly through the hole in the cooler, so that the washer lies flat against the inner wall.
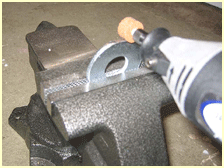
- OPTIONAL, BUT ESSENTIAL STEP: The washer must lie flat against the inner wall, but because of the curve where the cooler wall meets the floor, the washer may need to be cut or ground down. I had to do this to ensure a snug fit. I used a Dremel with a cut-off wheel and then a grinding stone to remove about 1/8” from the washer.
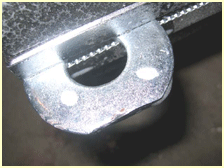
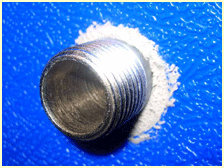
- Prepare some plumber’s epoxy as a long, thin rope. While holding the nipple assembly centered in the hole, press the epoxy into the gap around the nipple. Use a small flat screwdriver to push as much of the epoxy into the hole. Remove any excess epoxy, and smooth the surface so it’s flush with the outside wall.
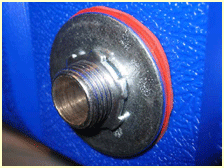
- Place the other washer over the outer portion of the nipple, then thread a conduit locknut on until it compresses against the washer. Slightly tighten the nut to hold the assembly in place while the epoxy sets — about 20 minutes. (NOTE: While the nut tightened down enough to hold the assembly firmly, I cut a rubber gasket to match the size of the metal washer out of a sheet of gasket material. This was placed between the outer wall and the washer during final assembly.)
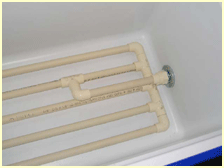
- While the epoxy sets, determine the position for the baffle that connects the manifold to the outlet valve. In my case, the outlet was fairly low, so I placed a tee about one-third of the way down one of the “even-numbered” runs in the manifold. The tee is turned about 45&Mac176; toward the center—if the tee was in the middle run, it would have to be oriented straight up, but would then be too high above the outlet. A short CPVC nipple connects the tee to an elbow. From the elbow, an approximately 6” length of CPVC connects to a _” CPVC to _” NPT female coupler threaded unto the inside of the nipple.
- Remove the outer locknut and washer. Check if the epoxy has fallen away from the gap into the cooler insulation. If so, fill the holes with some more epoxy. Replace the gasket (if needed), washer, and locknut.
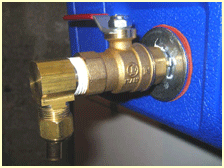
- Wrap the outer threads of the nipple with Teflon tape. Thread the ball valve unto the nipple.
- Wrap the threads of the brass _” NPT male to _” ID vinyl tubing elbow coupler with Teflon tape. Thread the coupler into the outlet of the valve. A length of _” ID vinyl tubing can then be attached to the coupler.
- With the ball valve closed, pour a couple gallons of warm water into what is now your homemade mash tun. Check for leaks. Check that the ball valve functions properly. Clean everything with hot water and dishwashing detergent to remove any gum left from price tags and dirt and dust.
Conclusion
Construction of this mash tun requires little in the way of money, time, and handyman skills. The final product enables you to create high-gravity 5-gallon batches, and low- to medium-gravity 10-gallon batches. If you’re looking for a way to get into all-grain brewing without investing a lot, you’ll enjoy and appreciate building your very own mash tun. Good luck, and happy brewing!
Tools:
Tape measure
Hacksaw
Drill, with 3/32” or 1/8” boring bit, and 3/4” spade bit
Philips screwdriver
Utility knife
Dremel tool, with cut-off disc (optional)
Materials and hardware
One (1) 48-quart plastic rectangular cooler ($16.95)
Two (2) 10’ lengths of 1/2” CPVC pipe (2 @ $2.98; $5.96)
Ten (10) 1/2” CPVC 90° elbows (10 @ $0.19; $1.90)
Ten (10) 1/2” CPVC tees (10 @ $0.18; $1.80)
Two (2) 1/2” CPVC hanger brackets (pack of 5; $0.56)
One (1) 1/2” CPVC to 1/2” NPT female coupler ($0.62)
One (1) 2” chrome or brass 1/2” NPT nipple ($1.76)
Two (2) 3/4” ID stainless steel cut washers (2 @ $0.18; $0.36)
Two (2) 1/2” stainless steel conduit locknuts (pack of 4; $0.49)
One (1) 1/2” NPT full-port brass ball valve ($5.98)
One (1) brass 1/2” NPT male to 1/2” ID vinyl tubing elbow coupler ($2.92)
Miscellaneous
Gasket material
Plumber’s epoxy
Small screws
Teflon tape
Fine-grit sandpaper
Copyright 2019 The Lunatic Fringe Home Brewery - All Rights Reserved
